According to Wikipedia, “HDR is a technique used in imaging and photography to reproduce a greater dynamic range of luminosity than is possible with standard digital imaging or photographic techniques. The aim is to present a similar range of luminance to be experienced through the human visual system.
HDR images can represent a greater range of luminance levels that can be achieved using more traditional methods such as real-world scenes containing very bright, direct sunlight to extreme shade. This is often achieved by capturing and combining several different exposures of the same subject matter.”
In my lesser technical world, HDR can be shot using 3 pictures on up to however many you decide. My cameras will allow me to shoot 3 shot HDR photos.
The series is this; one at normal settings, one at a step up to capture the highlights, and one a step down to capture the shadows. You are shooting the same photo composition 3 times. It may sound silly, but sometimes you can get more depth, or feeling in a photo that has more shadows or detail. 
Normal Photo

1 Stop down to capture the shadows

1 Stop up to capture the light
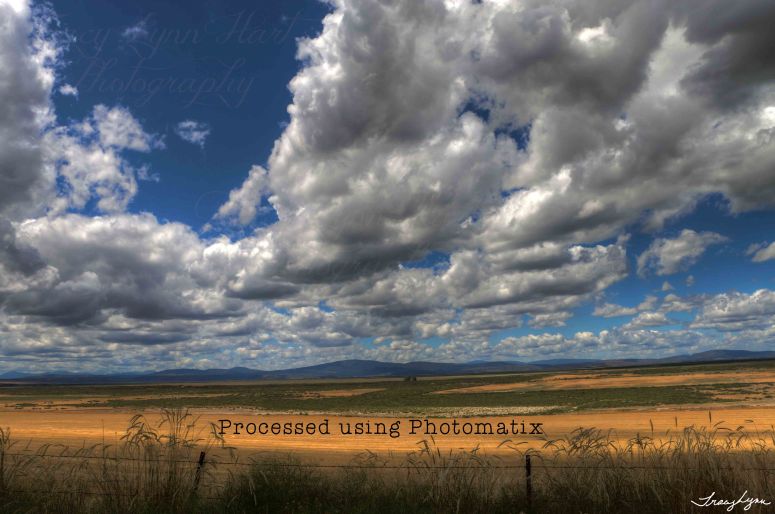
Three shot HDR, processed using Photomatix

Three shot HDR, processed using Aurora HDR
Yes, you need specific software to “merge” or “layer” your images. I use mostly a software called Photomatix. When I first discovered it, I had a fun time learning. Yes some of the photos were a bit over processed, but it was still fun. You can indeed take one photo (instead of 3) and run it thought the gauntlet so to speak, and make it a new image to you. This is a photo you may have taken 10 years ago! It’s all about learning and trying new things for your old photos, and of course your current photos.
I use two programs. Photomatix, as stated above and Aurora HDR. I am still learning the Aurora HDR, and I find it a bit qwerky, but I guess it’s all in the learning process. Photomatix was my first, and I do believe it was one of the first HDR programs. Used by many photographers, the Aurora HDR was created by an amazing photographer Trey Ratcliff, who I learned alot from watching his Photomatix video tutorials. I think (but don’t quote me) Aurora HDR was first created strictly for Mac computers.
How did I get into the world of HDR? I used to be big into digital scrapbooking, and one of the guru’s that made all kinds of neat things for that hobby, was also a photographer. He did some awesome amazing HDR of Montana, close to where I lived in Western Montana. I followed his processes, and bought a few books. Then I discovered Trey and took a course of his and thats how I got hooked.
There is something in HDR that is called “Ghosting” and sometimes this gets the best of me. If you are like me and take mostly hand held photos, there is going to be some movement.
When you take the three picture HDR, there are great chances if you are not using a tripod, you will have movement. So when your pictures are merging they also need to line up. So if they don’t line up properly, you get “ghost” effects on your photos, it can be pretty ugly, and no amount of adjustments, will take away the failed photo merge. I know this because I have given up on trying to merge the three photo set numerous times.
I do not claim, nor will I ever claim to be an expert on HDR photography and processing. Because once you claim you are an expert, you quit learning. I learn something new every time I process photos. Once I really like the outcome of the HDR process, its time to step into the studio so to speak, I will remove any unsightly power lines, or spots that are on my sensor that come through. I will also remove signs, if I find them annoying. The bottom line digital footprint is still there, but I am merely enhancing my photo. It’s not for everyone! And I don’t do it to all my photos. Most of what I post online are “SOOC” Straight Out of the Camera.

Normal Photo

1 Stop Down

1 Stop Up

3 Photo HDR
In this final photograph, I removed most of the power lines, removed buckets and trash, and cleaned up any other distracting objects that I felt were not beneficial to the photo. As a side note, this particular photo I entered into the local county fair in the Digital Manipulation category, and I am happy and proud to say, that it took Best of Show! I was/am a very happy girl!
You can indeed as stated above, turn a one photo shot, into an HDR, similar photo. I have done it many times just to give it a “pop”.
I have friends and family that don’t like the “digital manipulation” and that’s OK! They’re entitled to like what they like. They like the real stuff. So do I, but sometimes a photo straight out of the camera just needs a punch of something.


The world of HDR isn’t just for color photos either!!!! While you process them the same, they can really make a Black and White Photo really pop as well.


3 Photo HDR Black and White
If you notice the signature in the above black and white, it is my husbands signature, with my camera of course. He loves to shoot in HDR but refuses to learn the processing part. That’s okay. I give him credit, but the photo belongs to Tracy Lynn Hart Photography. In case you are wondering why he was taking these, I have a fear of all things ticks. AND… this was a field, in eastern Montana, with tall weeds, so I refused to go beyond the gravel road. He was the one that took the shots for me! Good job honey! You had a great teacher!!!
While HDR seems to be used in mostly landscape photography, I sometimes play around and use it for flowers, still life, and whatever else I think might work. If it works great, if not, there is that lovely delete key that will move the stuff to my trash can!
My advice to anyone wanting to try HDR. DO IT! You can download free trials of the programs, that is what I did in the beginning. You will need to learn your camera settings. Most DSLR’s have a custom setting where you can program it to take the 3 shots. Or however many your camera will take. Read your manual, google it, find out how to make it work for you.
Experiment! It’s all about finding what you as a photographer like!
Alot of your cell phones now have an HDR feature, I know mine does, and I think it works okay, but it’s not what I am used to.
I spend hours in the studio, mostly when the weather is bad or early in the morning. I would rather be outside taking photos or just being outside, instead of being cooped up inside.
It’s all a learning process and curve. I feel fortunate to have done as well as I have with my HDR processes. I have done alot of research, watched videos, and took a course online. I refuse to put alot of money into something that I don’t know if I will like. That is why the trial versions of the programs are a huge help!
Try something different! Be brave! Step out of that box!!!
Most of all, Enjoy!
Be Happy!

Abandoned Homestead in Eastern Montana along Highway 200

Abandoned Homestead in Eastern Montana along Highway 200


Historic Hotel Meade, Bannack Montana
Happy Shooting!
Tracy Lynn